JSON & AJAX
JSON
- JSON = JavaScript Object Notation
- A set of key/value pairs
- Keys must be stored in quotes
- Values can be Number, String, Boolean, Array, Object or null
- Resembles objects, hash tables, or structs of programming languages
- Can be validated at JSONlint.com
Example JSON
{
	"firstName": "Jane",
	"lastName": "Smith",
	"address": {
		"streetAddress": "425 2nd Street",
		"city": "San Francisco",
		"state": "CA",
		"postalCode": 94107
	},
	"phoneNumbers": [
		"212 732-1234",
		"646 123-4567" ]
}Moving JSON to the DOM
Start by storing JSON in a variable:
var myProfile = {
	"firstName": "Natalie",
	"lastName": "MacLees",
	"cats": ["Mabel", "Ollie"]};
Then, you can access the data stored inside and use it while creating new nodes:
var p = document.createElement('p');
p.innerHTML = 'My name is ' + myProfile.firstName + ' ' + myProfile.lastName + '. ';
p.innerHTML += 'My cats are ' + myProfile.cats.join(' and ') + '.';

var body = document.getElementsByTagName('body')[0];
body.appendChild(p);Let's Develop It!
http://bit.ly/intermediate-js-class-4-ex-1
Note: to get json files in your codepen.io
- Open Settings
- Go to JavaScript
- Add the url to "Add External JavaScript"
Questions?
Questions about JSON?
Ajax
Asynchronous JavaScript And "XML"

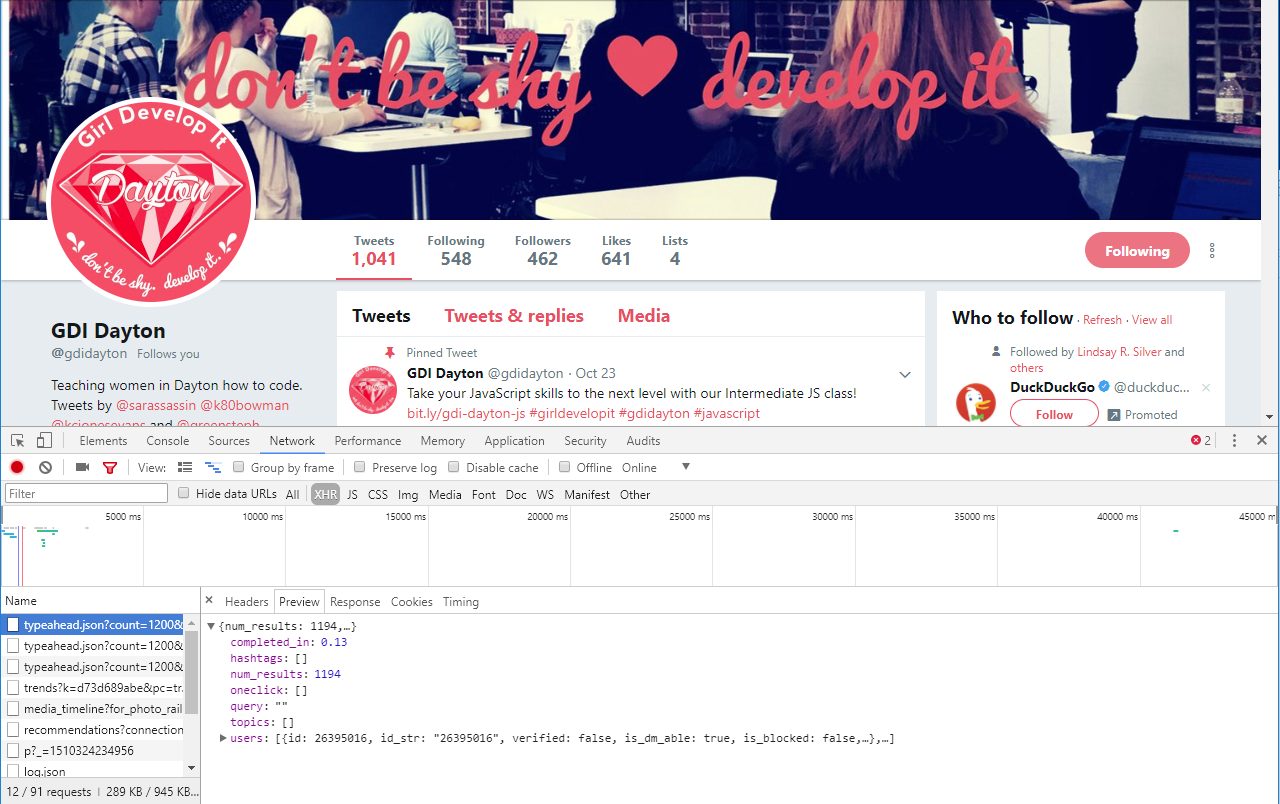
Ajax in the wild

Local server
We're going to start writing some ajax now.
If you haven't already, get a local server running.
Local server
- Open Terminal
- Navigate to your project directory. You can do this using the
cdcommand in the terminal. - Run this command:
python -m SimpleHTTPServer- If you are running Python 3, run this command instead:
python -m http.server 8000
- If you are running Python 3, run this command instead:
- If successful, you should then be able to access your project folder by pointing your browser to http://localhost:8000
The XMLHttpRequest object
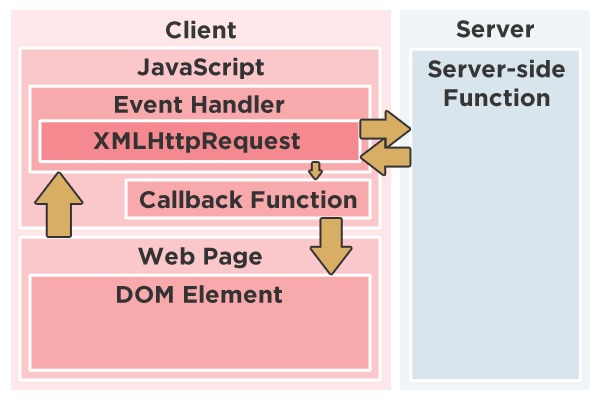
- A native JavaScript object that can communicate asynchronously between the client and the server.
- To use it, we create a new instance of the object:
var request = new XMLHttpRequest(); - ...and then use the properties and methods of that object to make an ajax call
Asynchronous means you can move on to another task before it finishes, while synchronous means you wait for it to finish before moving on to another task.
Getting ready to communicate
Now that we've created an instance of the XHR object, it needs to be prepped for communication. That requires three things:
- The
readystatechangeevent handler - The
open()method - The
send()method
readystatechange
- During an ajax operation, the server sends updates to the client about the current status of the communication by updating a property of the XHR object called
readyState. - Each time the
readyStateproperty is changed, thereadystatechangeevent is fired. - If you add an event listener function to the
readystatechangeevent, your function will execute each time the server pings the client with an update.
An onreadystatechange example
var request = new XMLHttpRequest();

if(request) {
	request.addEventListener('readystatechange', function(){
		console.log(request.readyState);
	});
}The open() method
The open() method takes two required arguments:
- The type of request (string)
- The location of the file on the server (string)
XMLHttpRequest.open(method, url)
XMLHttpRequest.open(method, url, async)
XMLHttpRequest.open(method, url, async, user)
XMLHttpRequest.open(method, url, async, user, password)
And an additional optional argument:
- Whether or not the request should be asynchronous (Boolean)
The open() method
var request = new XMLHttpRequest();

if(request) {
	request.addEventListener('readystatechange', function(){
		console.log(request.readyState);
	});
	request.open('GET', 'me.json', true);
}
Here's a me.json file you can include in your project to call.
Request types: GET and POST
GET-
- Most commonly used
- When you just want to retrieve a file from the server and you don't need to send any data
- Also capable of sending a small amount of data as a query string
POST-
- Useful for sending a lot of data to the server
Just FYI, there are some other request types too (PUT, DELETE, and HEAD, for example), but they're not a concern for the stuff we're doing.
Location of the file
- A string that contains either a relative, absolute, or full path to a file on the server
- The file you are requesting must reside in the same domain as the JavaScript file that is making the request.
Cross Domain Policy
If we're on this page: http://store.company.com/dir/page.html Here's how these ajax requests will work out:
| URL | Outcome | Reason |
|---|---|---|
| http://store.company.com/dir2/other.html | Success | |
| http://store.company.com/dir/inner/other.html | Success | |
| https://store.company.com/secure.html | Failure | Different protocol |
| http://store.company.com:81/dir/etc.html | Failure | Different port |
| http://google.com | Failure | Different host |
This is to prevent malicious scripts from running on the page.
Asynchronous
Indicates whether the request should occur asynchronously or not.
If true, the script will make the request and won't wait for the response from the server before moving on to the rest of the script.
If false, the browser will stop processing the script until the ajax request is completed.
Use true!
The send() method
Once your request is prepped by the open() method, it's ready to be sent!
XMLHttpRequest.send(body)send() using GET
var request = new XMLHttpRequest();

if(request) {
	request.addEventListener('readystatechange', function(){
		console.log(request.readyState);
	});
	request.open('GET', 'me.json', true);
	request.send();
}
Here's a me.json file you can include in your project to call.
Here is a link to the gist
POST: The setRequestHeader() method
Since we're sending data with the POST type, we have an extra step. We need to use the setRequestHeader method of the XHR object to set the request headers.
setRequestHeader() takes two arguments:
- Name of the header (string)
- Value of the header (string)
XMLHttpRequest.setRequestHeader(header, value);setRequestHeader() example
If you are sending data to the server, you need to set the value of the Content-type header to application/x-www-form-urlencoded, like this:
request.setRequestHeader('Content-type', 'application/x-www-form-urlencoded');This tells the server to expect some data and for that data to be URL-encoded.
URL-encoded means spaces become plus signs (+) and non-alphanumeric characters need to be encoded as hex values.
'name=Natalie+MacLees&message=JavaScript+is+awesome%21'send() using POST
var request = new XMLHttpRequest();

if(request) {
	request.addEventListener('readystatechange', function(){
		console.log(request.readyState);
	});
	request.open('POST', 'me.php', true);
	request.setRequestHeader('Content-type', 'application/x-www-form-urlencoded');
	request.send('name=Natalie+MacLees&message=JavaScript+is+awesome%21');
}
http://bit.ly/intermediate-js-class4-post
This code won't work with simpleserver (which does not support POST)
Let's Develop It!
In your project folder, create a simple .txt file with a sentence of plain text in it.
Next, set up a new XMLHttpRequest (XHR) object and get the file. Use the console tools to view the request.
Receiving a response
Phew! Now we've got sending a request down - let's learn how to receive a response!
The readyState property
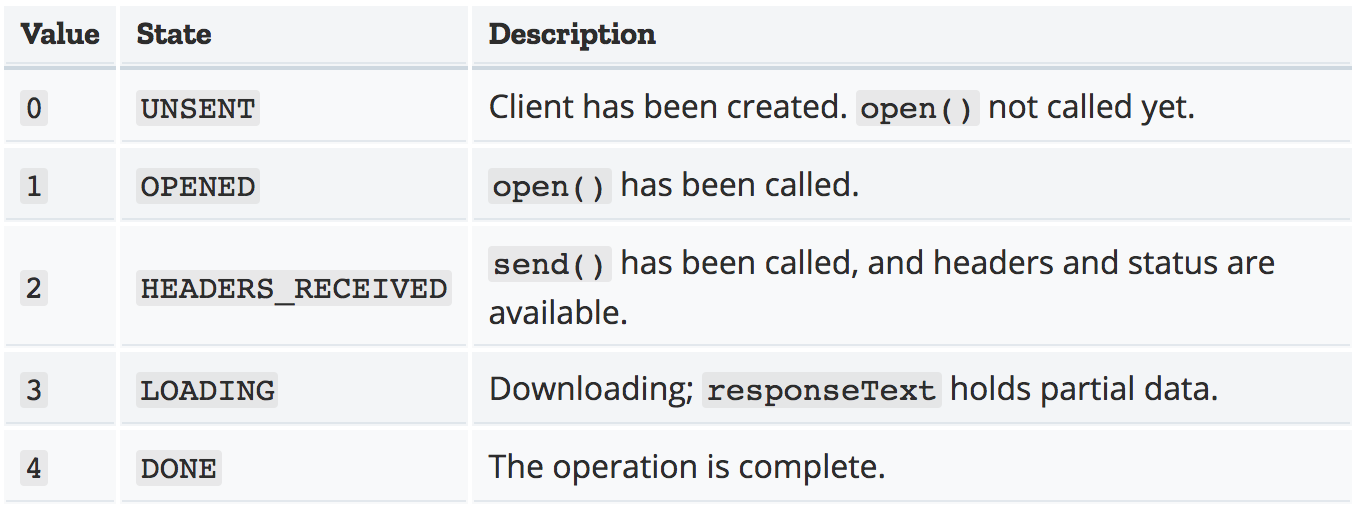
Indicates the current state of the Ajax request. Possible values:

readyState property and the readyStateChange event
In theory, the readyState property counts from 0 to 4 in order.
In practice, what happens is a bit unpredictable.
What we can count on is that if the value has reached 4, the server has finished sending a response.
Checking the readyState
var request = new XMLHttpRequest();

var doSomething = function() {
	if (request.readyState == 4) {
		console.log('The request is complete!');
		//do something with the response here
	}
}

if(request) {
	request.addEventListener('readystatechange', doSomething);
	request.open('GET', 'me.json', true);
	request.send();
}
doSomething() gets called every time the value of the readyState property changes, but our if statement ensures nothing will happen unless the value is 4.
Status
When the server sends back a response, it always includes response headers with metadata about the response.
These headers include a status code - a three digit number that is part of the HTTP protocol
Some examples:
404- not found403- forbidden500- internal server error
200 OK
The most common status code is 200, which means OK. It indicates the response was successfully sent.
The XHR object has a property called status where the status code is stored. We can check it to make sure we got a successful response:
var doSomething = function() {
	if(request.readyState == 4) {
		if(request.status == 200) {
			console.log('The request is complete and ok.');
			//do something with the response here
		}
	}
}
When things don't go as planned...
We can also add an else statement to deal with situations where things don't go according to plan:
var doSomething = function() {
	if(request.readyState == 4) {
		if(request.status == 200) {
			console.log('The request is complete and ok.');
			//do something with the response here
		} else {
			//something went wrong
		}
	}
}
The responseText property
The responseText property of the XHR object contains the data sent from the server as a string.
var doSomething = function() {
	if(request.readyState == 4) {
		if(request.status == 200) {
			console.log(request.responseText);
		}
	}
}
But we need JSON!
The responseText property contains our data, but it's a string, and we need JSON. We just need to convert it to JSON like this:
var jsonObj = JSON.parse(request.responseText);Putting it all together
Let's step through fetching some information from the server with ajax and displaying it on our page.
First, we need to create, prep, and send our request:
var request = new XMLHttpRequest();

var displayResponse = function(){
	// we'll write some code here later
};

if (request) {
	request.addEventListener('readystatechange', displayResponse);
	request.open('GET', 'me.json', true);
	request.send();
}
Next, we need a place in our HTML to display the results:
<div id="resultsBox"></div>Then, we'll handle the response
var displayResponse = function(){
	if (request.readyState == 4) {
		if (request.status == 200) {
			var jsonObj = JSON.parse(request.responseText);

			var p = document.createElement('p');
			p.innerHTML = 'My name is ' + jsonObj.firstName +
				' ' + jsonObj.lastName + ' and I live at ' +
				jsonObj.address.streetAddress + ' in ' +
				jsonObj.address.city + '. ';
			p.innerHTML += 'My zip code is ' +
				jsonObj.address.postalCode + '.';

			var displayBox =
				document.getElementById('resultsBox');

			displayBox.appendChild(p);
		}
	}
};
We're using what we already learned about dealing with JSON!
Let's Develop It!
Ajax
The XMLHttpRequest is the heart and soul of ajax. Its methods and properties drive the requests that make ajax feel so responsive.
Things to keep in mind
- Cross domain requests are restricted.
- Multiple ajax requests don't return in the same order they were sent.
Questions?
Questions about JSON or Ajax before we wrap up?
Thank you!
As you keep working with JavaScript, if you have questions or get stuck, post in our slack and we'll help you out!.